CowSync Guide › Documents & records
Drive: documents, certificates and files
Drive keeps every registration paper, DNA result, CVI, receipt, photo and video in one place, filed by folder and linked to your animals.
Drive is the ranch filing cabinet. It holds registration papers, DNA results, health certificates (CVIs), leases, receipts, photos and videos, sorted into folders and tied to your animals. To open it, click Workspace in the menu, then Drive. On the Workspace page the Documents & certificates and File drive tiles open the same place.
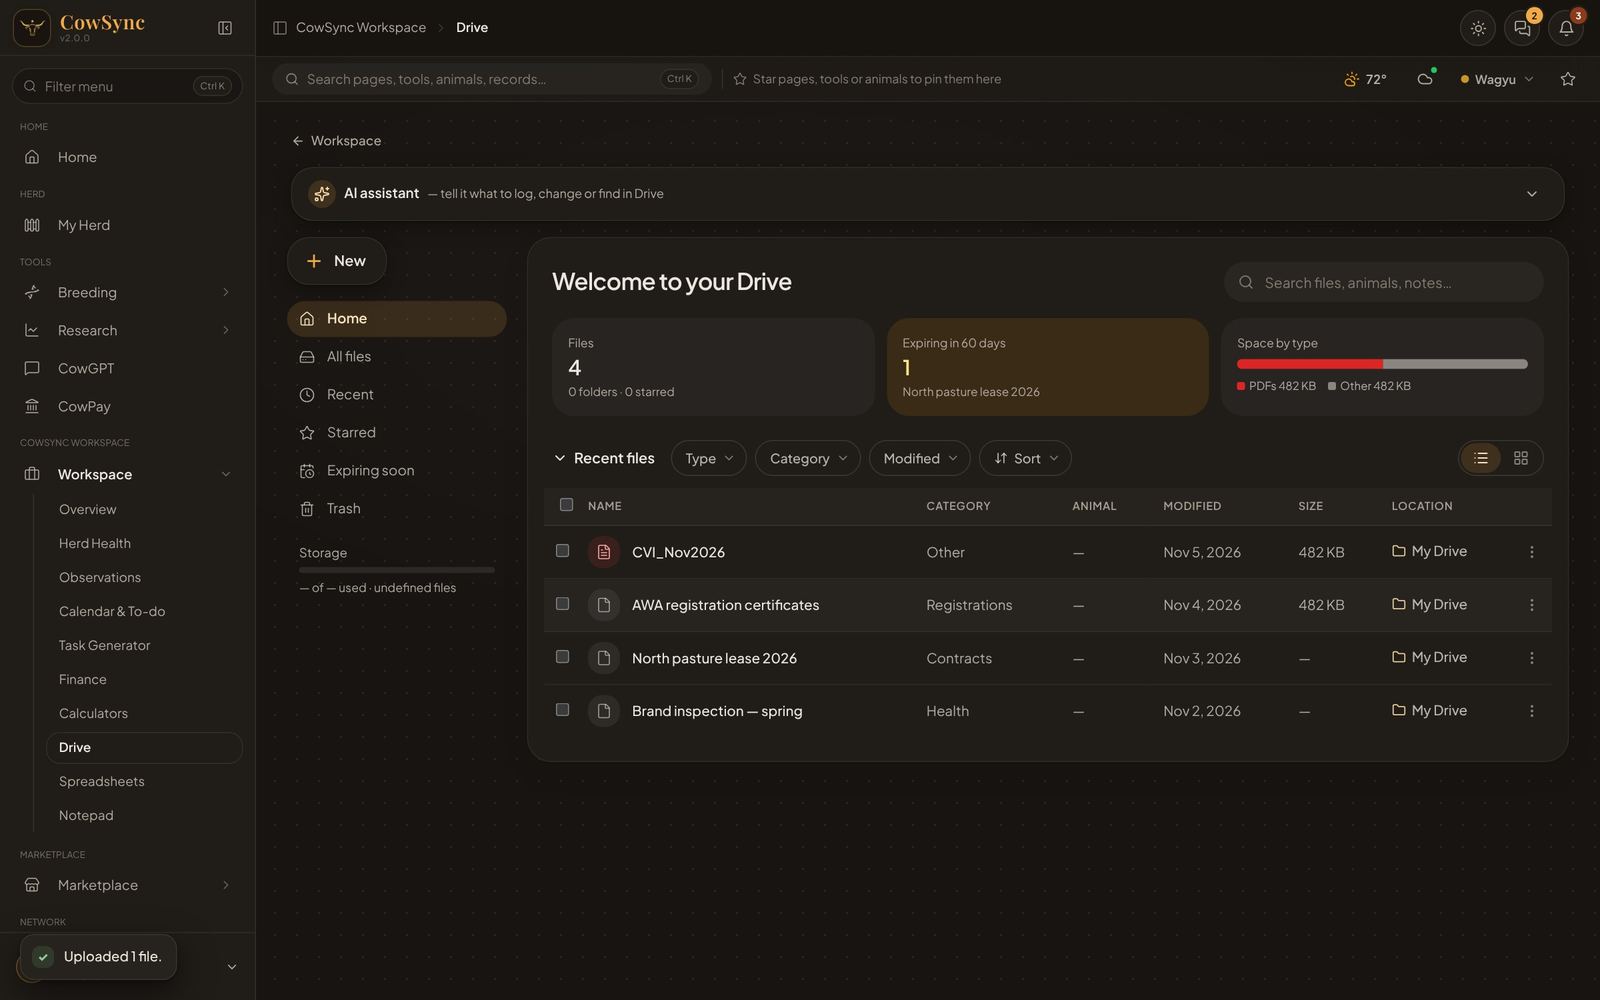
What is on the screen
- New (top left) has two choices: Upload files and New folder.
- Below it: Home, All files, Recent, Starred, Expiring soon and Trash. Trash shows a number when something is in it.
- Folders: every folder you have made. Click one to open it.
- Storage: a bar showing how much space you have used and how many files you have.
- The search box, Search files, animals, notes…, looks through titles, categories, animals, folders and notes.
Home also shows three cards: Files (with folder and starred counts), Expiring in 60 days (click it to see those files) and Space by type (PDFs, photos, videos and so on). Under that are your folders and your 12 newest files.
A new Drive says Nothing here yet until you upload something.
Upload files
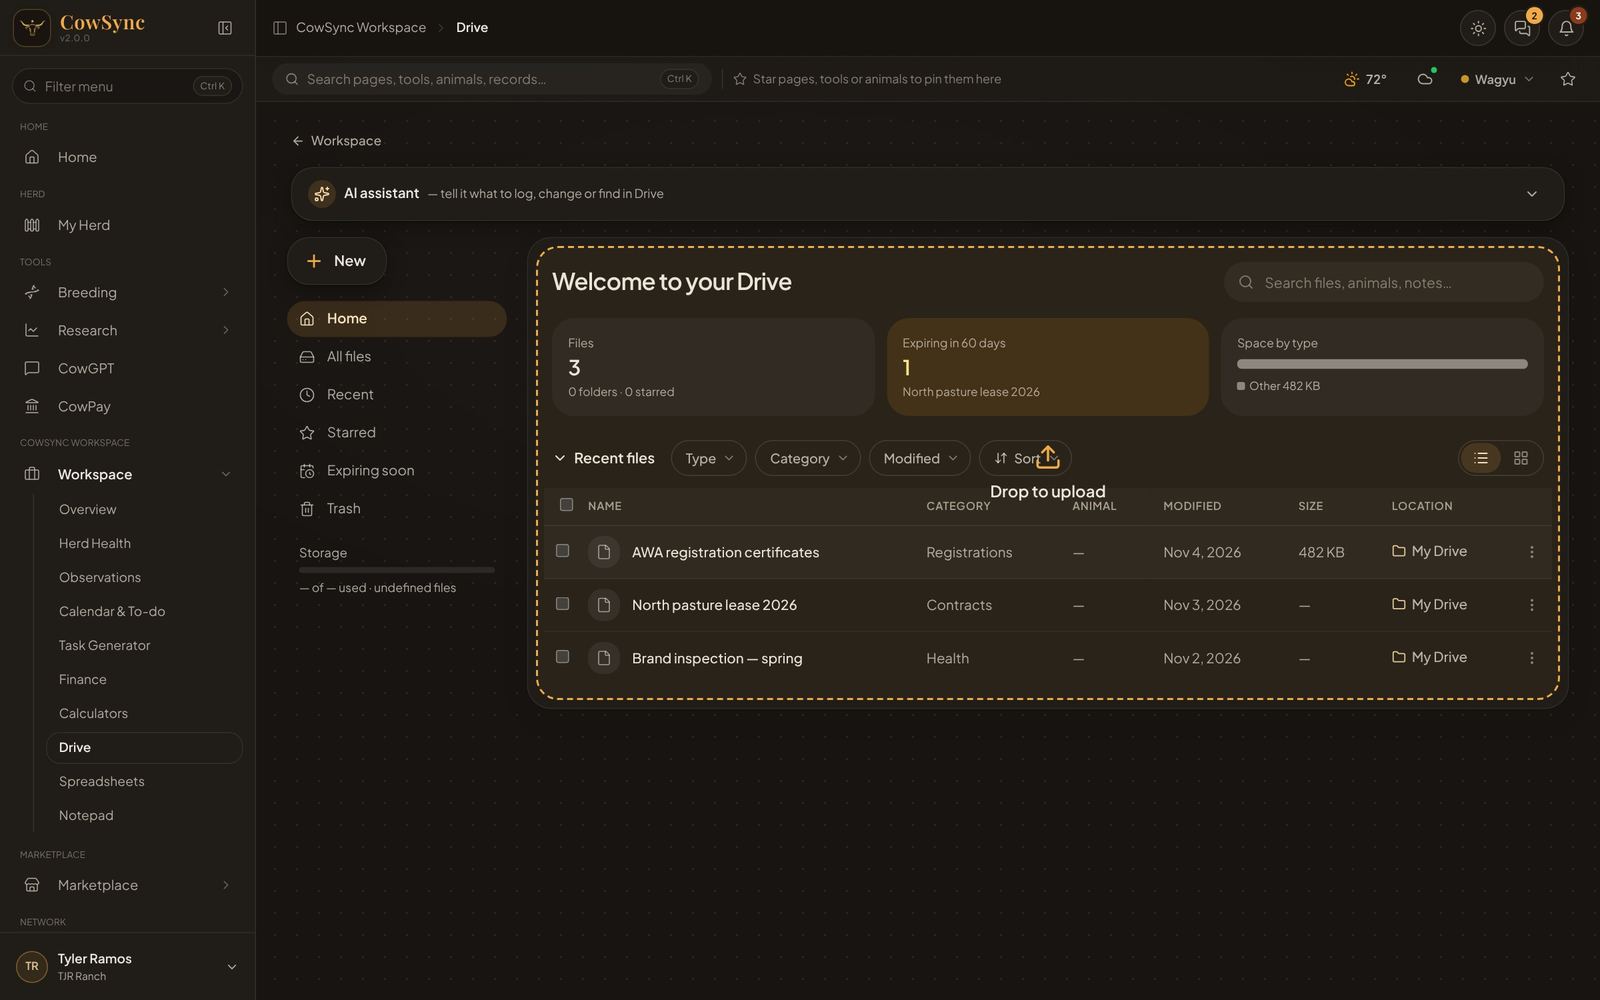
- Drag one or more files from your computer onto the Drive page. A gold dashed box says Drop to upload. Or click New → Upload files and pick them.
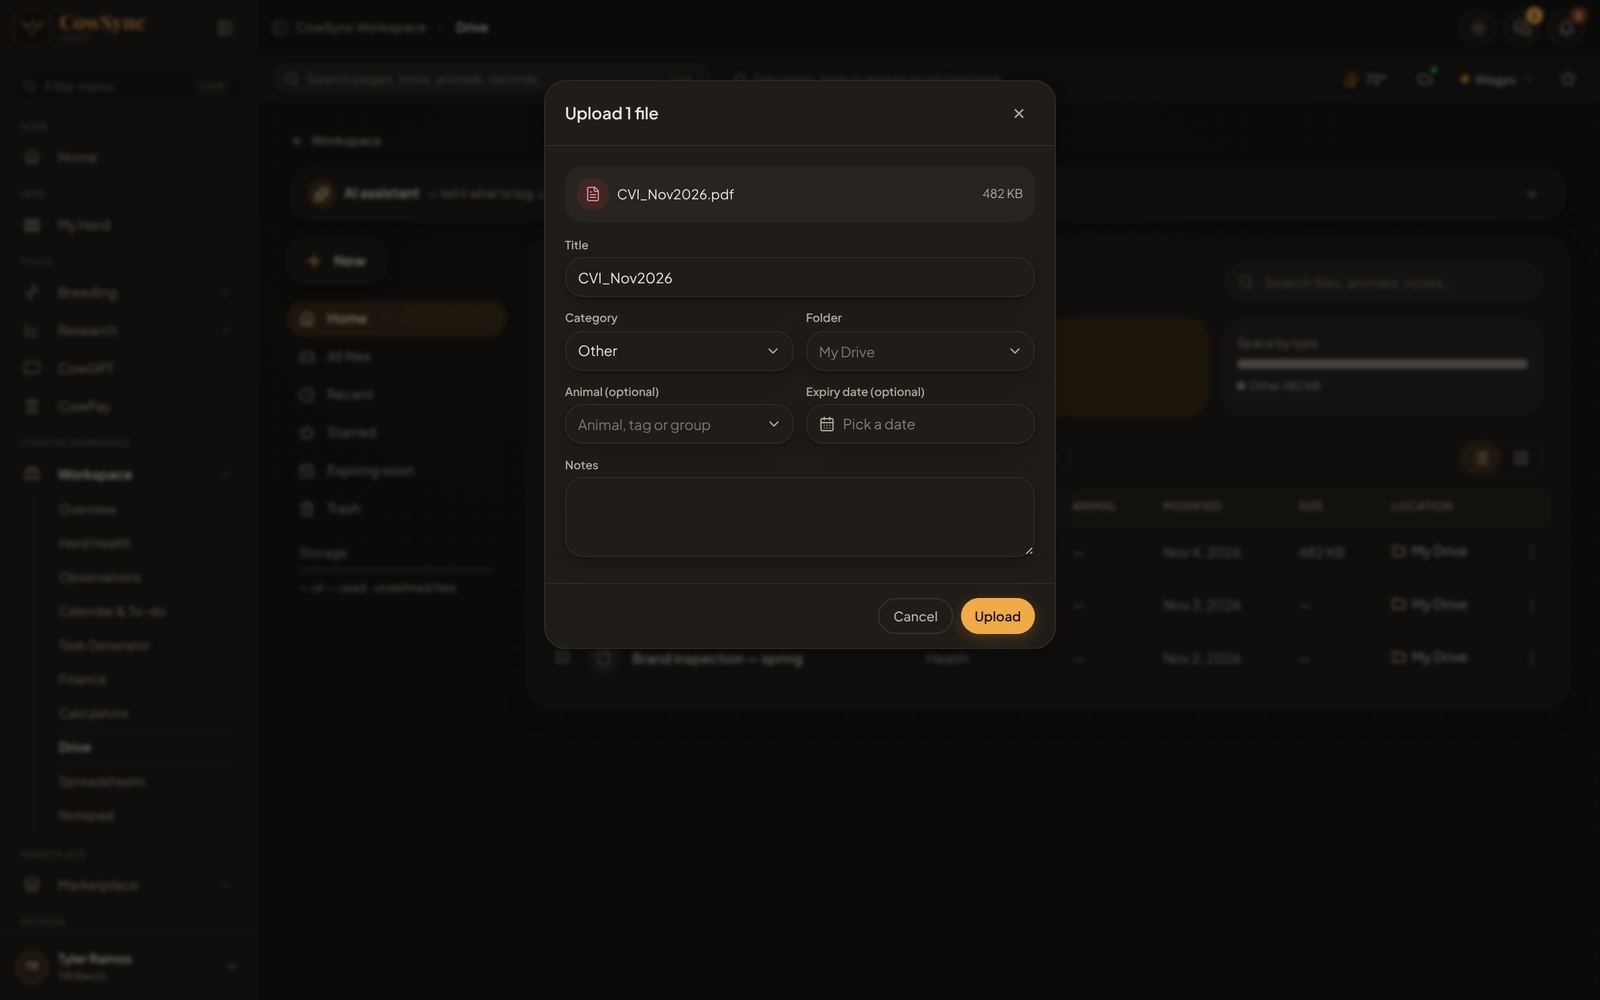
- The upload window opens. For a single file you can change the Title.
- Pick a Category, a Folder (leave it blank for My Drive), an Animal (optional), an Expiry date (optional) and any Notes.
- Click Upload. A bar shows each file going up. When it finishes you will see “Uploaded 1 file.”
Categories
Every file has one category: Registration, DNA / parentage, Health certificate (CVI), Vet record, Semen / embryo certificate, Agreement / contract, Invoice / receipt, Brand / inspection, Insurance, Lease, Photo / video or Other. The Category button above the list shows one kind at a time.
Link a file to an animal
Type the animal’s name, tag or group in the Animal box when you upload, or later with Edit details…. The animal shows in the Animal column, and the file turns up when you search for that animal. See Animal profile for everything else tied to one animal.
Folders
- Make one with New → New folder, type a name (for example “Registrations 2026”) and click Create.
- To move files, drag them onto a folder in the left list or onto a folder card. Drag onto All files or My Drive to take them out of a folder.
- Right-click a folder for Open, Upload here, Rename folder and Delete folder (files go to My Drive). Deleting a folder never deletes the files in it.
Narrow the list, sort and change the view
Above the file list are four buttons. Click one to open its short list of choices:
- Type: PDFs, Photos & images, Videos, Spreadsheets, Documents, Archives, Other.
- Category: the categories above.
- Modified: Today, Last 7 days, Last 30 days, This year.
- Sort: Name, Largest first, Expiry date, Oldest first. Without a choice, the newest changes come first.
Click the small x on a button to clear it. The two buttons on the right switch between a list and a grid of tiles. The grid shows small pictures of your photos.
The list columns are Name, Category, Animal, Modified, Size and Location (the folder). Right-click an empty part of the page for Upload files, New folder, Grid view (or List view) and Refresh.
Working with a file
Click a file to open the Details panel on the right. It shows a preview of photos, PDFs and videos, then the category, animal, file name, upload date, expiry, folder and notes. At the bottom are Download, a pencil (edit details) and a star. Double-click a file to download it straight away.
The three-dot button on each row (or a right-click) gives you:
- Download and Share link… (see below).
- Remind me before it expires, or Add to calendar… if the file has no expiry date.
- Send for signature… (PDFs only, see below).
- Details, Add to Starred, Rename, Edit details…, Move to folder and Move to trash.
Expiry dates and reminders
Give a file an expiry date (a CVI, an insurance policy, a lease) and Drive keeps watch:
- Expiring soon lists everything that runs out within 60 days.
- In the list, a file due within 30 days gets an amber tag such as Expires 12d. Once the date passes it turns red: Expired.
- Remind me before it expires opens the Add to calendar window with a “Renew” task already set for 14 days before the expiry. Click Save to put it on your calendar.
Starred
Star the papers you reach for all the time. They show a gold star and are listed under Starred.
Select many files at once
Tick the boxes, or hold Ctrl (Cmd on a Mac) and click each file. Hold Shift and click to pick a whole run. A dark bar appears with Download, Move, Category, Star and Trash. Ctrl+A picks every file on the page, the Delete key sends the picked files to the trash, and Esc lets go of them.
Trash
Trashed files wait in Trash until you deal with them. Use Restore to bring one back, Delete forever to remove it, or Empty trash to clear the lot. Deleting forever cannot be undone.
Share a file with a view-only link
A share link is a web address you send to someone (your vet, a buyer, the brand inspector). They can open and download the file without a CowSync account, but cannot change it.
- Open the file’s three-dot menu and choose Share link….
- Add a Message (optional) and choose when the Link expires: 1 day, 7 days, 30 days, 90 days or 1 year.
- Click Create view link. The link is copied for you, ready to paste.
- Or click Email or Text to open your own email or text messages with the link already written in.
The right side of the window, Links for this item, lists every link for that file, how many times it was viewed, and a tag: Active, Expired or Revoked. Click Copy to copy it again, or Revoke to shut it off at once.
Send a PDF for signature
- Upload the PDF to Drive, then open its three-dot menu and choose Send for signature….
- Type a Signer name (optional) (it fills in their name for them), a Message (optional) and when the Link expires.
- Click Create signing link, then paste it or use Email or Text.
The other person opens the link on any phone or computer, reads the PDF, types their full name (an email is optional), signs with a finger or mouse, ticks the box agreeing that the electronic signature counts, and clicks Sign document. Their signature, name and the date are added at the bottom of the last page, and they get a copy.
The signed copy lands in your Drive in a folder called Signed documents. Your original stays as it was. The link list then shows Signed, with who signed and when. Signatures are recorded with name, time and internet address.
Ask the AI assistant
In Advanced mode the AI assistant bar sits at the top of Drive. Type in plain English, for example “Which documents expire in the next 60 days?” or “Move every CVI into a Health papers folder”.